Starting: 1st of Every Month
  +91 8409492687 |
  Contact@DevOpsSchool.com
Upgrade & Secure Your Future with DevOps, SRE, DevSecOps, MLOps!
We spend hours on Instagram and YouTube and waste money on coffee and fast food, but won’t spend 30 minutes a day learning skills to boost our careers.
Master in DevOps, SRE, DevSecOps & MLOps!
Learn from Guru Rajesh Kumar and double your salary in just one year.
Source:- jitendrazaa.com
In this blog post we will go through steps to use Microsoft Team Foundation Server (TFS) to set up Continuous Integration.
We can either use cloud based Team foundation Server (TFS) or locally installed on network. For ease, we would be using cloud based TFS for this blog post.
Step 1: Creating developer account on VisualStudio Online
Navigate to https://www.visualstudio.com/ and choose Get Started for free in Visual Studio Team Services section. You may need to create a new Microsoft developer account, if you don’t have it already.
Step 2: Using TFS as source code repository
Once we are able to login to TFS, lets start by creating a code repository. That’s right, you don’t need separate Bitbucket or Github account to save your code/metadata unlike in Jenkins. So, our start with TFS is really good and impressive till this point ? . Wizard to create new project is self explanatory and would look like below image

Once new Project is created in Team Foundation Server, we can use any git client, like tortoise git to save code. For authentication purpose, we can either use normal username password flow or generate SSH key and use that key for authentication. This youtube video or blog post will help you to generate SSH key, if its something new to you. Once key is generated, we would need to save it on TFS so that it can validate authenticity of user.
If you think you are little bit lost here, don’t worry :). I have posted video as well at the end of this blog post, showcasing everything in detail.
Step 3 : Create & test ANT deployment script on local system
If you have visited this article, chances are high that you are well aware about ANT script to deploy metadata into Salesforce. If not, no worries, I got you covered here as well. This blog post will serve a purpose of guide and key to fantasy world of ANT migration toolkit.
Lets create a build.properties file, which will have all of your credentials and important information about deployment
build.properties
1 |
# build.properties |
2 |
sfSandbox.serverurl = https://test.salesforce.com |
3 |
sfPRO.serverurl = https://login.salesforce.com |
4 |
5 |
sfdc.cb.df14.username=Salesforceusername |
6 |
sfdc.cb.df14.password=Salesforcepassword |
7 |
sfdc.cb.df14.retrieveTarget=src |
8 |
sfdc.cb.df14.unpackaged=src\\package.xml |
9 |
sfdc.cb.df14.retrieveMessage = Script to retrieve metadata from Salesforce |
10 |
11 |
sfdc.cb.df15.username=Salesforceusername |
12 |
sfdc.cb.df15.password=Salesforcepassword |
13 |
sfdc.cb.df15.retrieveTarget=src |
14 |
sfdc.cb.df15.unpackaged=src\\package.xml |
15 |
sfdc.cb.df15.retrieveMessage = Script to retrieve metadata from Salesforce |
16 |
17 |
18 |
sfdcJarFile=ant-salesforce.jar |
build.xml
1 |
<project name="Deployment Scripts" default="deploy" basedir="." xmlns:sf="antlib:com.salesforce"> |
2 |
|
3 |
<property file="build.properties"/> |
4 |
|
5 |
<target name="df14"> |
6 |
<taskdef resource="com/salesforce/antlib.xml" uri="antlib:com.salesforce"classpath="${sfdcJarFile}"/> |
7 |
|
8 |
<echo message="${sfdc.cb.df14.username}"/> |
9 |
<sf:retrieve username="${sfdc.cb.df14.username}" password="${sfdc.cb.df14.password}"serverurl="${sfPRO.serverurl}" retrieveTarget="${sfdc.cb.df14.retrieveTarget}"unpackaged="${sfdc.cb.df14.unpackaged}" /> |
10 |
</target> |
11 |
|
12 |
<target name="deploy"> |
13 |
<taskdef resource="com/salesforce/antlib.xml" uri="antlib:com.salesforce"classpath="${sfdcJarFile}"/> |
14 |
|
15 |
<sf:deploy username="${sfdc.cb.df15.username}" password="${sfdc.cb.df15.password}"serverurl="${sfPRO.serverurl}" deployRoot="src" maxPoll="1000" testLevel="NoTestRun" checkOnly="false"pollWaitMillis="10000" rollbackOnError="true"/> |
16 |
</target> |
17 |
|
18 |
</project> |
Important difference to notice above is that how Salesforce jar is referred. In some situations where we have access to system, we simply put address of jar file of Salesforce migration toolkit in classpath. However in this scenario, as we are using cloud based solution for Continuous Integration, we need to refer jar file location relative to code base. Therefore while pushing build.properties and build.xml as a code in git, we would need to push ant-salesforce.jar file as well.
Once all above settings are in place, try to run command
ANT df14 deploy
Target df14 will retrieve source code from one Salesforce instance and would deploy same code to df15 instance in our example.
Step 4 : New Build definition in Team Foundation Server
In this step, we will create New build definition informing TFS which ANT target to invoke.
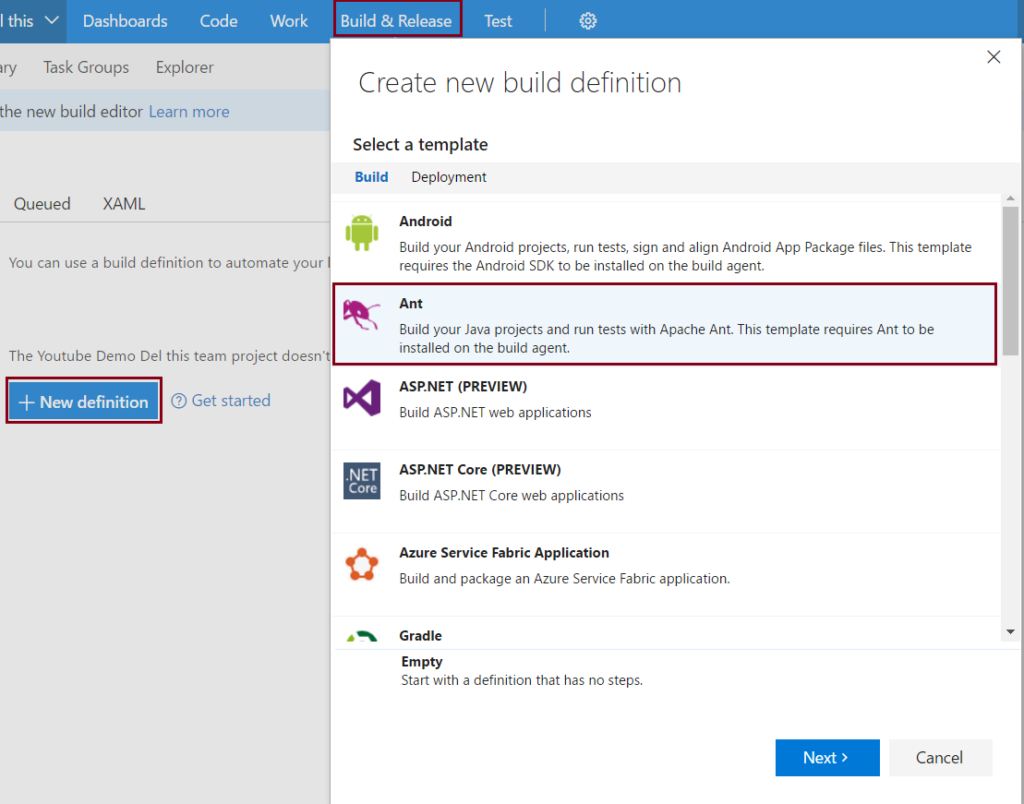
Navigate to Build & Release | New definition | Build | Ant
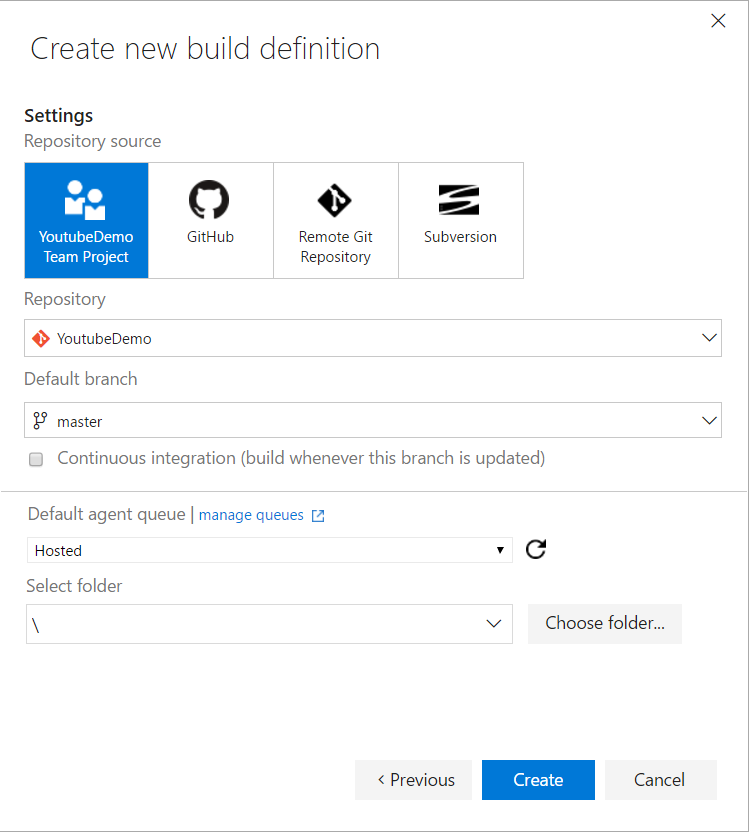
In next screen, we would need to select repository. It has few options like Github, some remote Git repository or SVN. As we have already created Git project in TFS itself, we have selected that. Next option we have is to choose a Git branch. It is possible that we need nightly build on one branch and hourly build on some other code base branch. So to address these kind of situation, we can have multiple builds in same project with different branches.
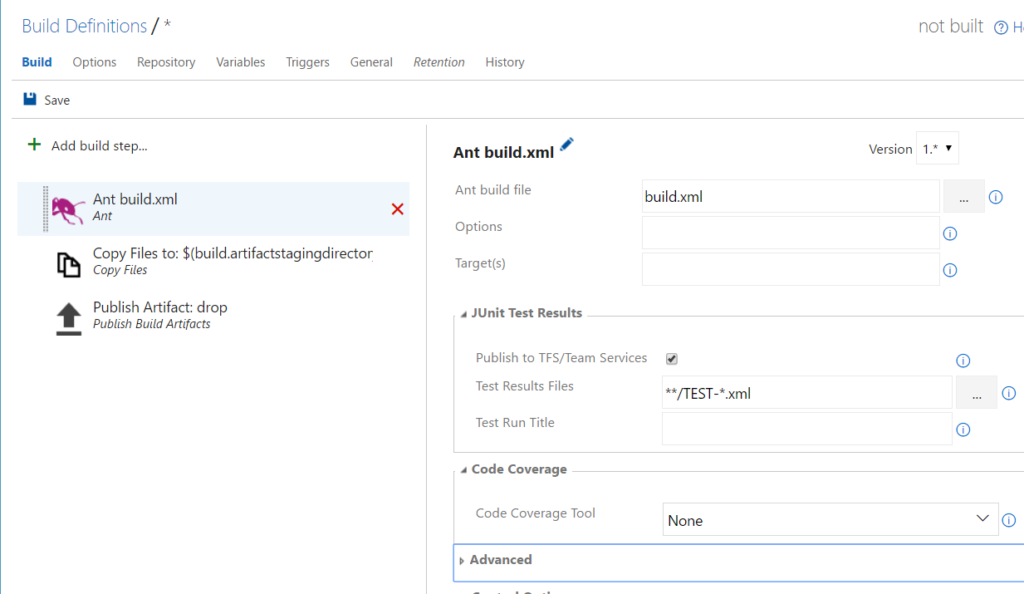
Next screen would be to add build steps of ANT. In our example, we have already specified default target however you can add ANT target depending on requirements. Once we save below screen, we are all set to test our Continuous Integration project using Microsoft’s Team Foundation Server.