Starting: 1st of Every Month
  +91 8409492687 |
  Contact@DevOpsSchool.com
Upgrade & Secure Your Future with DevOps, SRE, DevSecOps, MLOps!
We spend hours on Instagram and YouTube and waste money on coffee and fast food, but won’t spend 30 minutes a day learning skills to boost our careers.
Master in DevOps, SRE, DevSecOps & MLOps!
Learn from Guru Rajesh Kumar and double your salary in just one year.
In the previous sections, we have learned to create a simple Flutter application and its basic styling to the widgets. Now, we are going to learn how to arrange the widgets in rows and columns on the screen. The rows and columns are not a single widget; they are two different widgets, namely Row and Column. Here, we will integrate these two widgets together because they have similar properties that help us understand them efficiently and quickly.
Row and column are the two essential widgets in Flutter that allows developers to align children horizontally and vertically according to our needs. These widgets are very necessary when we design the application user interface in Flutter.
Key Points
- Row and Column widgets are the most commonly used layout patterns in the Flutter application.
- Both may take several child widgets.
- A child widget can also be a row or column widget.
- We can stretch or constrain a particular children’s widget.
- Flutter also allows developers to specify how child widgets can use row and column widgets’ available space.
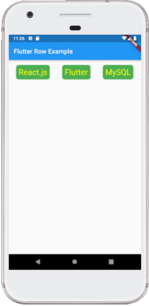
Row Widget
This widget arranges its children in a horizontal direction on the screen. In other words, it will expect child widgets in a horizontal array. If the child widgets need to fill the available horizontal space, we must wrap the children widgets in an Expanded widget.
A row widget does not appear scrollable because it displays the widgets within the visible view. So it is considered wrong if we have more children in a row which will not fit in the available space. If we want to make a scrollable list of row widgets, we need to use the ListView widget.
Let us understand it with the help of an example where we are going to align the content such that there is an even space around the children in a row:
| import 'package:flutter/material.dart'; | |
| void main() { runApp(MyApp()); } | |
| class MyApp extends StatelessWidget { | |
| @override | |
| Widget build(BuildContext context) { | |
| return MaterialApp( | |
| home: MyHomePage() | |
| ); | |
| } | |
| } | |
| class MyHomePage extends StatefulWidget { | |
| @override | |
| _MyHomePageState createState() => _MyHomePageState(); | |
| } | |
| class _MyHomePageState extends State<MyHomePage> { | |
| @override | |
| Widget build(BuildContext context) { | |
| return Scaffold( | |
| appBar: AppBar( | |
| title: Text("Flutter Row Example"), | |
| ), | |
| body: Row( | |
| mainAxisAlignment: MainAxisAlignment.spaceEvenly, | |
| children:<Widget>[ | |
| Container( | |
| margin: EdgeInsets.all(12.0), | |
| padding: EdgeInsets.all(8.0), | |
| decoration:BoxDecoration( | |
| borderRadius:BorderRadius.circular(8), | |
| color:Colors.green | |
| ), | |
| child: Text("React.js",style: TextStyle(color:Colors.yellowAccent,fontSize:25),), | |
| ), | |
| Container( | |
| margin: EdgeInsets.all(15.0), | |
| padding: EdgeInsets.all(8.0), | |
| decoration:BoxDecoration( | |
| borderRadius:BorderRadius.circular(8), | |
| color:Colors.green | |
| ), | |
| child: Text("Flutter",style: TextStyle(color:Colors.yellowAccent,fontSize:25),), | |
| ), | |
| Container( | |
| margin: EdgeInsets.all(12.0), | |
| padding: EdgeInsets.all(8.0), | |
| decoration:BoxDecoration( | |
| borderRadius:BorderRadius.circular(8), | |
| color:Colors.green | |
| ), | |
| child: Text("MySQL",style: TextStyle(color:Colors.yellowAccent,fontSize:25),), | |
| ) | |
| ] | |
| ), | |
| ); | |
| } | |
| } |
 by
by Output:
When we run this app, we should get the UI as the below screenshot.
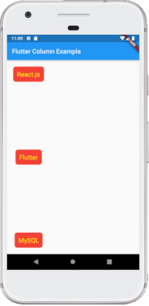
Column
This widget arranges its children in a vertical direction on the screen. In other words, it will expect a vertical array of children widgets. If the child widgets need to fill the available vertical space, we must wrap the children widgets in an Expanded widget.
Let us understand it with the help of an example where we are going to align the content such that there is a free space between the children evenly in a column:
| import 'package:flutter/material.dart'; | |
| void main() { runApp(MyApp()); } | |
| class MyApp extends StatelessWidget { | |
| @override | |
| Widget build(BuildContext context) { | |
| return MaterialApp( | |
| home: MyHomePage() | |
| ); | |
| } | |
| } | |
| class MyHomePage extends StatefulWidget { | |
| @override | |
| _MyHomePageState createState() => _MyHomePageState(); | |
| } | |
| class _MyHomePageState extends State<MyHomePage> { | |
| @override | |
| Widget build(BuildContext context) { | |
| return Scaffold( | |
| appBar: AppBar( | |
| title: Text("Flutter Column Example"), | |
| ), | |
| body: Column( | |
| mainAxisAlignment: MainAxisAlignment.spaceBetween, | |
| children:<Widget>[ | |
| Container( | |
| margin: EdgeInsets.all(20.0), | |
| padding: EdgeInsets.all(12.0), | |
| decoration:BoxDecoration( | |
| borderRadius:BorderRadius.circular(8), | |
| color:Colors.red | |
| ), | |
| child: Text("React.js",style: TextStyle(color:Colors.yellowAccent,fontSize:20),), | |
| ), | |
| Container( | |
| margin: EdgeInsets.all(20.0), | |
| padding: EdgeInsets.all(12.0), | |
| decoration:BoxDecoration( | |
| borderRadius:BorderRadius.circular(8), | |
| color:Colors.red | |
| ), | |
| child: Text("Flutter",style: TextStyle(color:Colors.yellowAccent,fontSize:20),), | |
| ), | |
| Container( | |
| margin: EdgeInsets.all(20.0), | |
| padding: EdgeInsets.all(12.0), | |
| decoration:BoxDecoration( | |
| borderRadius:BorderRadius.circular(8), | |
| color:Colors.red | |
| ), | |
| child: Text("MySQL",style: TextStyle(color:Colors.yellowAccent,fontSize:20),), | |
| ) | |
| ] | |
| ), | |
| ); | |
| } | |
| } |
Output:
When we run this app, we should get the UI as the below screenshot.